A unique solution saved months of time on this in-service inspection.
Problem

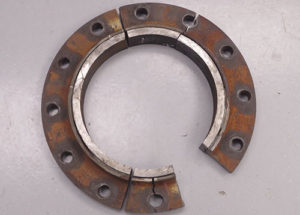
We received several broken flanges from a client in Redwater, Alberta that had failed during bolting/torqueing. The flanges were expected to be made of “ductile iron” (DI), but they turned out to be made of grey cast iron (with inferior mechanical properties). Metallographic examination of a larger batch revealed that none were ductile iron and were mostly compacted graphite iron (CGI; with somewhat lower ductility and tensile strength than DI) or grey iron (with almost nil ductility and much lower tensile strength). The client decided they would need to remove any grey cast iron immediately. The challenge was identifying the type of cast iron for over 200 piping components already in service.
Acuren Solution
Typical destructive metallurgical examination methods were used for the failure analysis part of the investigation and non-destructive testing for characterization of the components in service. The senior engineer on this project proposed a more reliable test plan, an improved turnaround time and a significant cost reduction over the client’s original approach, because he recognized, and incorporated, that these materials had different sonic properties.
Examination of over 200 components in service was completed in about 2 weeks.
The engineer’s out of the box thinking, combined with a strong technical background made a break-through in the investigation that reduced the schedule by 1 month.
Technical

Initially, in-situ metallography (using replicas) was considered, but that would take a few months to complete. An ultrasonic velocity test was chosen to sort out the components.
Grey iron has a characteristically low sound traveling velocity (approx. 3500 m/s) due to the abundance of large overlapping graphite flakes. DI and CGI, on the other hand, exhibits a much higher velocity (approx. 5000-6000 m/s) due to a free path of travel between graphite particles.
Another advantage of the ultrasonic test over an in-situ metallography was its higher accuracy and reliability. The velocity test samples the material through a large thickness, while replication examines the microstructure at the surface, which can be very different from that at the core or across the thickness for a casting.
Credentials
• Professional Engineer
• UT Technican
Damage Mechanism
• Instantaneous (overload) fractures upon bolting/torqueing
Value
Acuren engineers and technicians have unparalelled education and field experience which, when combined, enables productivity solutions otherwise not possible. With the proposal of using a special type of non-destructive testing (UT instead of replicas) the second part of the investigation took approximnately 2 weeks instead of the originally estimated 1-2 months.
Engineers, field technicians and NDT experts collaborated to find a suitable technique based on the engineer’s unique idea which saved time, cost and increased reliability.
Acuren provides state-of-the-art nondestructive testing, inspection, engineering and rope access enabled integrated services, delivered throughout 110+ locations and utilizing 5,500 employees across North America and the United Kingdom.
To speak to our team about this project or to find out how we can help solve your complex challenges, please call 1-800-218-7450 or email us.
Access the PDF for this project by clicking on the image:


